Showing posts with label ASP.NET. Show all posts

ResourceManager with External Localization Assembly

As a software developer I like to work with everything that is related to software Localization known as L10n. Besides being a developer working defining the architecture that will be adopted in a given project and doing the hard “FUN” work writing the code, I’m also a translator if you don’t know it yet.

One thing I've been trying to do recently is to be able to use localized strings that are present in an external assembly [ DLL ] using the ResourceManager object.
I have localized strings in resource [ .resx ] files that are specific for each locale I support. I place these .resx files in a separate class library project to maintain things organized.

So, suppose the namespace of this class library is MyProject.L10n and the .resx file name is Localization.resx. This gives me access to a class named Localization within the code. I also have Localization.pt.resx. I support English and Portuguese locales in my project for now. This naming pattern allows me to have in the future a file called Localization.es-ES.resx for Castilian Spanish (as written and spoken in Spain) and another one called Localization.es-AR.resx for Argentine Spanish. During runtime the .NET framework will select the correct .resx file to extract the localized string from based on the current culture the user has set while browsing my website.

After adding a reference to this class library, I'm able to use this code in my ASP.NET MVC project in a Razor view:

MyProject.L10n.Localization.LocalizedString;

This works as expected, but it's not what I need, though. As you see the localized string key [ LocalizedString ] is hard coded. I want to be able to use the method GetString from the ResourceManager object so that I can write code like this:

ResourceManager.GetString(item.DynamicLocalizedStringValue);

The problem and the catchy here is that in order to use the resource manager the way I want, I have to point it to the external assembly this way:

grid.Column(
columnName: "Type",
header: Localization.Type,format: (item) => new ResourceManager("MyProject.L10n.Localization", typeof(Localization).Assembly).GetString(item.Type.ToString()))

This part does the tricky: typeof(Localization).Assembly

In the code block above I’m using WebGrid that is a new helper that comes with ASP.NET MVC 3. It simplifies the task of rendering tabular data. When I do item.Type.ToString() I’m actually getting different values for each row of my grid and I pass this dynamic value to ResourceManager that in return gives me the translated/localized version of a give string key.

Going even further I’ve implemented a Razor’s Helper method in a file called Helpers.cshtml and placed such file inside the App_Code folder. This is the helper’s code:

@using System.Resources
@using MyProject.L10n

@helper GetLocalizedString(string stringValue)
{
    ResourceManager rm = new ResourceManager("MyProject.L10n.Localization", typeof (Localization).Assembly);

    @rm.GetString(stringValue);
}

Now it’s just a matter of calling the helper this way in whatever place/view I need it:

grid.Column(
columnName: "Type",
header: Localization.Type,
format: (item) => @Helpers.GetLocalizedString(item.Type.ToString()))

The above code is way more clear than the one I showed your before…

Hope this post helps shed some light in this subject since the only thing that should be done is to get a reference to the assembly that holds the Localization class and pass it to the ResourceManger’s constructor.

Replacing Web.config settings with Transforms

First off: this is the 100th post I write in this blog. A great amount of shared info… Party smile

Now let’s say you want to point to a different connection string when you deploy your ASP.NET Web Project to your hosting provider. Until recently you’d have to modify your Web.config file manually. This is an easy procedure but you might end screwing up the file in some way.

Visual Studio 2010 comes with a great new feature called Web.config Transformation that allows you to perform transformations in whatever section of your Web.config file. This transformation process happens automatically when you build the deployment package for your application. Transformations occur as part of the MSBuild process. With this it’s easy to change the connection string (or better yet, anything you want) depending on the configuration currently selected when you build the deployment package. No more Web.config manual editing. Thanks God!

This post shows a simple replace transformation in which I replace one of my app settings named Connection.

This is the actual code of my Web.config file:

<appSettings>
<!-- Database connection pointer -->
<add key="Connection" value="MyProject.Web.Settings.local" />
</appSettings>
<connectionStrings>
<
add name="MyProject.Web.Settings.local" connectionString="Server=localhost\sqlexpress;Database=MyDatabase;Integrated Security=True;" providerName="System.Data.SqlClient" />
<
add name="MyProject.Web.Settings.hostingProvider" connectionString="Server=123.45.678.9;Database=MyDatabase;UID=user;PWD=pass123;MultipleActiveResultSets=true;Asynchronous Processing=True;" providerName="System.Data.SqlClient" />
</connectionStrings>

Step 1 - Create a new Configuration named Test:

Visual Studio Configuration Manager (menu Build => Configuration Manager)Figure 1 - Visual Studio Configuration Manager (menu Build => Configuration Manager)

Creating a New ConfigurationFigure 2 - Creating a New Configuration

New Solution Configuration named TestFigure 3 - New Solution Configuration named Test

Step 2 - Right-click your project’s Web.config file and select Add Config Transforms:

Adding Config Transforms for the Web.config fileFigure 4 - Adding Config Transforms for the Web.config file

Now you’ll see that VS creates one Web.config file for each configuration we have defined. Now we have 3 child .config files/transforms. In this case Web.Debug.config and Web.Release.config are related to the standard configurations that are automatically created with new web projects. Web.Test.config is related to the Test configuration we created in Step 1.

Web.config transforms backing filesFigure 5 - Web.config Transforms backing files

Step 3 - Double click Web.Test.config and add this code:

<?xml version="1.0"?>

<!-- For more information on using web.config transformation visit http://go.microsoft.com/fwlink/?LinkId=125889 -->

<configuration xmlns:xdt="http://schemas.microsoft.com/XML-Document-Transform">
    <appSettings>

        <!-- Database connection pointer -->
        <add key="Connection" value="MyProject.Web.Settings.hostingProvider" xdt:Transform="Replace" xdt:Locator="Match(key)" />

    </appSettings>

</configuration>

Above I’m transforming the Web.config file so that when I build my deployment package for the Test configuration I have the Connection appsetting replaced. My Connection appsetting will then point to the hostingProvider connection string. Take a special look in the transform I’m using (Replace) and the Locator to match the key Connection. For a more detailed explanation about the available transforms, read the post Web Deployment: Web.Config Transformation by Vishal Joshi.

Step 4 - Make sure you have selected the Test configuration in Visual Studio. Now Create the deployment package by right-clicking your ASP.NET Web Project and select Build Deployment Package:

ASP.NET Web Project’s Build Deployment Package context menu optionFigure 6 - ASP.NET Web Project’s Build Deployment Package context menu option

When you do this Visual Studio 2010 will generate a package with all the necessary files your app needs to run. My package is created in this path:

C:\MyProject\trunk\MyProject\MyProject.Web\obj\Test\Package

Inside this folder you’ll find a .zip file named MyProject.Web.zip (the package) that you can use to install the app in IIS or you can handle it to the one responsible for actually installing the app on the server.

Note: Visual Studio 2010 comes with other great feature that allows you to Publish this package directly to your hosting provider using Web Deploy, FTP, etc. I’ll cover this in another post…

You’ll also find a folder named PackageTmp. This folder has everything that goes into that .zip package. Open the Web.config file that lies within this folder and see if the transformation was applied correctly. It should’ve been applied.

In my case in my main Web.config file I’m pointing to a local connection string:

<add key="Connection" value="MyProject.Web.Settings.local" />

This makes sense since I’m working in my home machine. The transformation I'm applying should transform/replace the Connection appsetting when I build the deployment package for the Test configuration. Now the appsetting must point to the hosting provider connection string like this:

<add key="Connection" value="MyProject.Web.Settings.hostingProvider" />

Hope this simple sample helps shed some light in this really powerful and interesting feature that comes with Visual Studio 2010.

Note: if you wanna get direct access to the original and transformed Web.config files, check these folders:

C:\MyProject\trunk\MyProject\MyProject.Web\obj\Test\TransformWebConfig\original

C:\MyProject\trunk\MyProject\MyProject.Web\obj\Test\TransformWebConfig\transformed

Test transforms online
http://webconfigtransformationtester.apphb.com/

Access web app from Parallels Win 7 VM in Mac OS

About a month ago I started the creation of an ASP.NET MVC 3 app to a buddy. I’ll write some blog posts in the near future sharing my experiences with this awesome web framework. This app I’m still developing is a web application that I develop using my "new” computer. Today I use Mac OS as my main operating system and since I’m using ASP.NET I also need to use Windows.

Parallels Desktop is the way to go to have a Windows virtual machine [ VM ] running side by side with Mac OS. This way you have the best of both worlds. I discuss more about Parallels Desktop here.

One of the things I wanted to do during the development was seeing how the app would look like when viewed in a different OS, in this case, I’d like to see it running in Mac OS as if I were an end user accessing the app. This is good to test how the app behaves when it’s viewed in a different environment, that is, the perspective/environment of the end user, and not the developer’s perspective/development environment.

It’s cool to see the app running in a different OS and different web browsers. In Mac OS I have the chance of testing it against Safari too. I also have the chance of seeing how exceptions are being handled. There are certain types of errors that only happen when the end user is using the app in his environment. I think you know that already. This kind of testing allows me to deliver a better user experience.

When the app is accessed from the Mac side, the first difference is mainly visual because my Win 7 VM has all visual effects (clear type) disabled and so things look really simple if compared to Mac OS. I’m running the VM with no visual effects so that I have a somewhat fast VM to do the development. I only have 4 GB RAM available and I have to share it with both operating systems. I thought 4 GB RAM would suffice but that’s not the case. I have already ordered 8 GB RAM but am eagerly waiting it arrive from US. That’s another story that I plan to write in other blog post.

The reason I’m writing this post is that things don’t work at first when you try to access in Mac your app that is running in Windows VM. To get things working from both sides ( host = Mac OS and VM = Windows 7 ) they must see/communicate with each other. That’s where I had to do some work to get things going. So here are some instructions of what you need do:

1 - Set a fixed IP address for Windows VM
Set up a fixed IP address (read this page for a complete guide) in your Windows 7 virtual machine. This will make it easy when you need to access your app from Mac OS side. You won’t need to take note of different IP addresses handled by the DHCP server each time you restart your VM.

Windows 7 VM with fixed IP addressFigure 1 - Windows7 VM with fixed IP address

Above I have given the IP 192.168.1.106 to the VM. As I do not have a lot of devices connected to my wireless router, this IP is just fine.

2 - Set Virtual Machine’s Network Type
In your Parallels VM devices bar set your network type (orange arrow) as bridged:

Parallels Desktop VM devices toolbarFigure 2 - Parallels Desktop VM devices toolbar

3 - Test Communication between Host and VM
Make sure both operating systems can see each other.

Open Mac OS Terminal and execute a ping command:

ping 192.168.1.106

Change the IP with the IP you have in your Windows VM.

You should see something like this:

Mac OS Terminal pinging Windows 7 VMFigure 3 - Mac OS Terminal pinging Windows 7 VM

Now, open Windows 7 Command Prompt and ping Mac IP address. To see your Mac IP address go to System Preferences. Under Internet & Wireless, select Network.

Mac OS IP addressFigure 4 - Mac OS IP address

Let’s ping 192.168.1.100:

Windows 7 VM Command Prompt pinging MacFigure 5 - Windows 7 VM Command Prompt pinging Mac

As you see, both computers can see/communicate with each other. This means that the Network is working as expected.

4 - Configure Windows VM webserver for external traffic
What address should you type in a Mac OS browser to access the app? Well, this needs a little bit of caring. You’ll probably fail when trying to access the app with the same address you use in Windows side.

I’m using IIS Express as the web server in Windows. You can install it using Microsoft WebMatrix. IIS Express is by default configured to only server internal traffic (Windows VM). As I’m trying to access it from an external environment (Mac OS), I needed to configure it. The first link bellow was the main doc that helped me:

Serving external traffic with WebMatrix Beta
Handling URL Binding Failures in IIS Express (Serving External Traffic)

Basically I had to configure HTTP.SYS, create a URL binding that allow me to access the app in Mac side and disable Windows Firewall for my private home network.

4.1 - Configure HTTP.SYS
Type this command in Windows command prompt:

netsh http add urlacl url=http://leniel-pc:7777/ user=everyone

Change the url in the above command according to your desired configuration.

Note: the above command requires elevation. Right click the command prompt shortcut and select Run as administrator.

4.2 - Configure URL binding
As mentioned in the 2nd doc referenced above you must open your applicationhost.config file and add URL bindings that fit your needs. Mine is located here:

C:\Users\Leniel\Documents\IISExpress\config\applicationhost.config

Take a look at the last binding I have added:

<site name="FitnessCenter" id="3">

<application path="/" applicationPool="Clr4IntegratedAppPool">

<virtualDirectory path="/" physicalPath="C:\Users\Leniel\Documents\Visual Studio 2010\Projects\FitnessCenter\FitnessCenter.Web" />

</application>

<bindings>

<binding protocol="http" bindingInformation="*:7777:leniel-pc" />
<binding protocol="http" bindingInformation="*:7777:localhost" />

<binding protocol="http" bindingInformation=":7777:leniel-pc" />

<binding protocol="http" bindingInformation="192.168.1.106:7777:"/>

</bindings>

</site>

4.3 - Configure Windows VM firewall
The last step is disabling Windows VM firewall for your Home or work private networks.

Windows 7 VM FirewallFigure 6 - Windows 7 VM Firewall

As I just use this virtual machine to do software development, it’s ok to me to disable the firewall. Be careful though. Surprised smile

5 - Access Win 7 VM web app in Mac OS
After all this configuration you should be able to browse your app externally.

To see if everything is working, open a browser in Mac OS and try to access the app typing something as this in my case:

http://192.168.1.106:7777/

That’s it.

Hope it helps.

Manipulating Properties and Methods with Reflection

Today I’m going to write about a simple yet powerful way to manipulate properties and methods of a given type. We’ll set values to properties and invoke methods through the use of reflection.

Maybe you haven’t had the chance to use reflection or maybe you even don’t know what is reflection.

Reflection is one of the most powerful features a programming language has as is the case of C# programming language that I’ll be using in this post.

In just one phrase extracted from Wikipedia we can define what is reflection:

Reflection is the process by which a computer program can observe and modify its own structure and behavior. The programming paradigm driven by reflection is called reflective programming.

Our objective is to manipulate the property value and methods of a type by means of reflection, that is, we’ll have access to these properties and methods by looking at the type’s metadata.

Let’s exemplify with a specific case that I came into while I was working on my first project at Chemtech: we had our ASP.NET solution divided into specific projects in what we call the MVP pattern. I suggest that you to read the post Model View Presenter pattern with Castle in ASP.NET to get a grasp of it.

In a given task I had 15 static textboxes inside an .aspx page (View) and I needed to set their values inside the Presenter. What is the best way to do it? Should you hardcode each and every textbox setting their values? It’s not an elegant solution. So how to get over it? Using reflection to get the type’s metadata. Let’s see how it is easy.

Let’s get to the code:

private void BindProperty(string viewPropertyName, object propertyValue)
{
    // Getting the property I want to use.
    PropertyInfo propertyInfo = typeof(IMyView).GetProperty(viewPropertyName);

    // Verifying if the property was acquired with success.
    if (propertyInfo != null && propertyInfo.CanWrite)
    {
        // Set the property value.
        propertyInfo.SetValue(view, propertyValue, null);
    }
}

Reflection allows us to make a generic piece of code, that is, with only one method we can set the value of all the textboxes.

The above method receives the property name as a parameter and we also pass to the method the value we want to assign to the property.

This same approach can be used with methods. Let’s see an example:

private void BindMethod(string viewMethodName, object[] methodParameters)
{
    // Getting the method I want to use.
    MethodInfo methodInfo = typeof(IMyView).GetMethod(viewMethodName);

    if (methodInfo !=null)
    {
// Call/Invoke the method with the desired parameters. methodInfo.Invoke(view, methodParameters); } }

Again we have a generic piece of code that can be used to call whatever method we want passing whatever parameters we want.

To use PropertyInfo and MethodInfo we declare the namespace System.Reflection.

We could make these methods even more generic by passing the view object (type) we want as a parameter. Bellow I show a class named ReflectionUtil with such modifications:

/// <summary>
/// Utility class for Reflection operations.
/// </summary>
public class ReflectionUtil
{
    /// <summary>
    /// Sets a value to a property through the use of Reflection.
    /// </summary>
    /// <param name="obj">Object that owns the property</param>
    /// <param name="propertyName">Property name</param>
    /// <param name="propertyValue">Value to be set</param>
    public static void BindProperty(object obj, string propertyName, object propertyValue)
    {
        // Getting the property I want to use.
        PropertyInfo propertyInfo = obj.GetType().GetProperty(propertyName);

        // Verifying if the property was acquired with success.
        if (propertyInfo != null && propertyInfo.CanWrite)
        {
            // Set the property value.
            propertyInfo.SetValue(obj, propertyValue, null);
        }
    }

    /// <summary>
    /// Calls a method through the use of Reflection.
    /// </summary>
    /// <param name="obj">Object that owns the method</param>
    /// <param name="methodName">Method name</param>
    /// <param name="methodParameters">Method parameters</param>
    public static void BindMethod(object obj, string methodName, object[] methodParameters)
    {
        // Getting the method I want to use.
        MethodInfo methodInfo = obj.GetType().GetMethod(methodName);

        if (methodInfo != null)
        {
// Call/Invoke the method with the desired parameters. methodInfo.Invoke(obj, methodParameters); } } }

OK. Now that we have the methods defined, let’s use them.

I’ll use the application I’ve shown in Model View Presenter pattern with Castle in ASP.NET as the base for this post.

IMyView interface declares the following members:

public interface IMyView : IBaseView
{
    event EventHandler FirstLoading;

    void MyMethod();

    string TextBox1Text { set; }
    string TextBox2Text { set; }
    string TextBox3Text { set; }
    string TextBox4Text { set; }
    string TextBox5Text { set; }
    string TextBox6Text { set; }
    string TextBox7Text { set; }
    string TextBox8Text { set; }
    string TextBox9Text { set; }
    string TextBox10Text { set; }

    void FillGridView1(List<object> values);
    void FillGridView2(List<object> values);
}

MyView implements what’s in IMyView interface:

public partial class MyView : Page, IMyView
{
    private MyPresenter presenter;

    .
.
.
#region Implementation of IMyView public event EventHandler FirstLoading; public void MyMethod() { Response.Write("Reflection power"); } #region TextBoxes public string TextBox1Text { set { TextBox1.Text = value; } } public string TextBox2Text { set { TextBox2.Text = value; } }

.
.
. #endregion #region Methods public void FillGridView1(List<object> values) { GridView1.DataSource = values; GridView1.DataBind(); } public void FillGridView2(List<object> values) { GridView2.DataSource = values; GridView2.DataBind(); } #endregion #endregion }

Inside the Presenter MyPresenter I implement the logic with the following:

/// <summary>
/// Specific FirstLoading implemented by each inheritor
/// </summary>
protected override void FirstLoading()
{
    view.MyMethod();

    // Useful technique to avoid calling 10 lines of code.
    for (int i = 1; i <= 10; i++)
    {
        ReflectionUtil.BindProperty(view, string.Format("TextBox{0}Text", i), (i * i).ToString());
    }

    // Useful technique to avoid writing methods almost identical just to change a method call.
    for (int i = 1; i <= 2; i++)
    {
        // Do some common logic here...

        // Call a specific method with Reflection.
ReflectionUtil.BindMethod(view, string.Format("FillGridView{0}", i), new object[] { new List<object> { i * 2, i * 3, i * 4, i * 5 } }); // Do some common logic here... } }

When we run the web app, we get the following result:

Reflection result

I covered just a simple use case of reflection in this post but it’s useful in our day to day job.

The technique implemented in this post allows us to write clean and generic code. I have already used it in another project which allowed me to write as few lines of code as possible. Let’s say it decreased from 250 sloc to 25 sloc. A reduction of 10 times sloc.

Last note
I read the article Survival of the Fittest: Natural Selection with Windows Forms on MSDN Magazine when I was on the 9th period of the Computer Engineering course studying Artificial Intelligence. From this moment on I started to visualize the importance of reflection and how powerful it is. The referenced article discusses about Genetic Algorithms and the author’s sample code makes extensive use of reflection. Great read if you’re interested enough! Oh, I even translated this article to Portuguese at that time. I want to put it online so that others can benefit from it. :o)

Visual Studio 2010 C# ASP.NET Web Application
You can get the Microsoft Visual Studio Project at:

http://sites.google.com/site/leniel/blog/ReflectionWebApp.zip

To try out the code you can use the free Microsoft Visual Web Developer 2010 Express Edition that you can get at: http://www.microsoft.com/express/Web/

Model View Presenter pattern with Castle in ASP.NET

This post shows how to implement the Model View Presenter (MVP) architectural pattern using Castle Project, which is an Inversion of Control Container framework. Castle Project has two IoC containers: MicroKernel and the Windsor Container.

Employing Castle Project containers and ASP.NET it turns out to be a simple task to have a Web App that takes advantage of the MVP pattern.

The simple approach I describe here is of great utility when you need a powerful and proven framework to develop your web applications based on Web Forms.

Let’s start with Solution Explorer inside Visual Studio 2008:

 MVP Web App Castle Project - Visual Studio Solution Explorer

In the following sections I’ll describe what role each file of the project plays…

Inversion of Control (IoC)
To implement the Inversion of Control principle, we define a static class called IoC as follows:

using System;
using Castle.Windsor;

namespace MvpWebAppCastleProject
{
    public static class IoC
    {
        private static IWindsorContainer container;

        public static void Initialize(IWindsorContainer aContainer)
        {
            container = aContainer;
        }

        public static T Resolve<T>()
        {
            try
            {
                return container.Resolve<T>();
            }
            catch(Exception e)
            {
                throw e;
            }
        }
    }
}

The container has a generic method Resolve<T> responsible for resolving at runtime the right component of your project to use.

Global.asax
In the Global.asax.cs code-behind file we initialize the IoC contatiner inside the Application_Start method:

using System;
using System.Web;

namespace MvpWebAppCastleProject
{
    public class Global : HttpApplication
    {
        protected void Application_Start(object sender, EventArgs e)
        {
            IoC.Initialize(new BusinessContainer());
        }
    }
}

As you see, a new instance of the class BusinessContainer is passed to the IoC.Initialize method. BusinessContainer is a custom made container that inherits from WindsorContainer:

using Castle.Core;
using Castle.Windsor;
using MvpWebAppCastleProject.Presenters;

namespace MvpWebAppCastleProject
{
    public class BusinessContainer : WindsorContainer
    {
        public BusinessContainer()
        {
            RegisterComponents();
        }

        private void RegisterComponents()
        {
            // Presenters
            AddComponentWithLifestyle("HelloWorld.presenter", typeof(HelloWorldPresenter), LifestyleType.Transient);
        }
    }
}

Inside the business container we register the components that are part of the web application. In this case, I’m registering only one component. I’m giving it the name HelloWorld.presenter and am also specifying its type as HelloWorldPresenter.

Defining a Base Presenter
Let’s define a base presenter to make things as generic as possible with the intent of avoiding code repetition and to keep code reuse throughout the app as follows:

using System;
using MvpWebAppCastleProject.Interfaces;

namespace MvpWebAppCastleProject.Presenters
{
    /// <summary>
    /// Base Presenter Typed
    /// All the Presenters should inherit from this one and implement the methods
    /// </summary>
    /// <typeparam name="T"></typeparam>
    public abstract class BasePresenter<V>
        where V : IBaseView
    {
        /// <summary>
        /// Typed View
        /// </summary>
        protected static V view;

        protected BasePresenter()
        {

        }

        /// <summary>
        /// Registers the View to the Presenter
        /// </summary>
        /// <param name="myView">View type</param>
        public void RegisterView(V myView)
        {
            if(myView == null)
            {
                throw new ArgumentNullException("View cannot be null.");
            }

            view = myView;

            SubscribePresenterToViewEvents();
        }

        /// <summary>
        /// Subscribe the Presenter to View events
        /// </summary>
        protected abstract void SubscribePresenterToViewEvents();

        /// <summary>
        /// Specific FirstLoading implemented by each inheritor
        /// </summary>
        protected abstract void FirstLoading();

        /// <summary>
        /// Run when the page is loaded for the first time
        /// </summary>
        protected void FirstLoading(object source, EventArgs eventArgs)
        {
            FirstLoading();
        }
    }
}

BasePresenter is an abstract class that uses generics concepts. Looking at the class definition we have that when an object type inherits from the base presenter it must specify a view to which it’ll be linked. BasePresenter accepts any view that directly inherits from IBaseView.

BasePresenter also has abstract methods that’ll be materialized (overridden) inside each Presenter that inherits from it.

Defining a Base View
To keep things simple here, I haven’t done any work in the IBaseView interface, but you can make things generic inside your base view just as was done inside the base presenter:

namespace MvpWebAppCastleProject.Interfaces
{
    public interface IBaseView
    {

    }
}

Implementing a View Interface
Let’s now implement a view interface that inherits from the base interface IBaseView:

using System;

namespace MvpWebAppCastleProject.Interfaces
{
    public interface IHelloWorldView : IBaseView
    {
        event EventHandler FirstLoading;

        void HelloWorld();
    }
}

This view interface (contract) implies that a real view that inherits from it must implement an event handler called FirstLoading and a void method called HelloWorld().

Implementing a View that inherits from the View Interface
A view is nothing more than an .aspx page with its controls, events, methods and everything else.

This is the view’s code:

using System;
using System.Web.UI;
using MvpWebAppCastleProject.Interfaces;
using MvpWebAppCastleProject.Presenters;

namespace MvpWebAppCastleProject.Views
{
    public partial class HelloWorldView : Page, IHelloWorldView
    {
        private HelloWorldPresenter presenter;

        protected void Page_Load(object sender, EventArgs e)
        {
            // Inversion of Control
            presenter = IoC.Resolve<HelloWorldPresenter>();
            presenter.RegisterView(this);

            if(!IsPostBack)
            {
                if(FirstLoading != null)
                {
                    FirstLoading(this, EventArgs.Empty);
                }
            }
        }

        #region Implementation of IHelloWorldView

        public event EventHandler FirstLoading;

        public void HelloWorld()
        {
            Response.Write("Hello World from ASP.NET Web App that implements the MVP pattern!");
        }

        #endregion
    }
}

Here is where the components of the MVP pattern start to fit each other.

As you see the view inherits from the ASP.NET Page object and from its respective interface IHelloWorldView.

HellowWorldView has a reference to its respective presenter HelloWorldPresenter. This object (the presenter) is the one responsible for the business logic. It’s the incarnation of other programming pattern called Delegation.

Inside the view’s Page_Load method we use the IoC contatiner to resolve the presenter we want to bind to the view. Remember the Resolve<T> method inside the IoC class? This method will search the list of components registered in the method RegisterComponents() inside the BusinessContainer class defined above.

After having an instance of the presenter we’re ready to call its method RegisterView() passing to it this (the view/.aspx page).

Note that the view implements the event FirstLoading and the method HelloWorld() defined in its interface IHelloWorldView.

Implementing the Presenter
HelloWorldPresenter is the last piece of code to complete the MVP pattern. Here is its code:

using MvpWebAppCastleProject.Interfaces;

namespace MvpWebAppCastleProject.Presenters
{
    public class HelloWorldPresenter : BasePresenter<IHelloWorldView>
    {
        public HelloWorldPresenter()
        {

        }

        #region Overrides of BasePresenter<IHellowWorldView>

        /// <summary>
        /// Subscribe the Presenter to View events
        /// </summary>
        protected override void SubscribePresenterToViewEvents()
        {
            view.FirstLoading += FirstLoading;
        }

        /// <summary>
        /// Specific FirstLoading implemented by each inheritor
        /// </summary>
        protected override void FirstLoading()
        {
            view.HelloWorld();
        }

        #endregion
    }
}

The presenter class definition shows that it inherits from BasePresenter that takes an interface (IHelloWorld) as parameter. IHelloWorld is a valid interface because it inherits from IBaseView.

Now take a look at the overridden methods SubscribePresenterToViewEvents() and FirstLoading().

When the presenter first loads it’ll call its view method HelloWorld().

This is the output you get when you run the web app:

MVP Web App Castle Project - Hello World View

Summary
This post shows in a short and to the point way how you can implement the Model/View/Presenter pattern in your ASP.NET web applications.

Using the Model/View/Presenter pattern you’ll have more control over your code. It allows you to decouple responsibilities in your project in such way that you can delegate responsibilities to the right object in a clear fashion.

You keep the files that compose your solution in a folder structure that allows for fast maintenance and organization.

If you want to learn more about the subject discussed in this post, I advise you to read Wikipedia’s articles listed in the References section below.

Hope you make good use of it!

Notes
Although I do not present in this post the Model part of MVP, it’s straightforward to implement it. You’d have a new folder called Model in your project where you’d put the files related to your data model. You could employ LINQ to SQL to represent your model. Again you could use abstraction defining a base repository forcing repository classes to implement the base default methods.

You may have heard about the Model-View-Controller (MVC) pattern. MVP is in contrast with MVC. If you want to know the slight differences between these two patterns take a look at this excellent discussion on StackOverflow titled: What are MVP and MVC and what is the difference?

Visual Studio 2008 C# ASP.NET Web Application
You can get the Microsoft Visual Studio Project at:

http://sites.google.com/site/leniel/blog/MvpWebAppCastleProject.zip

To try out the code you can use the free Microsoft Visual Web Developer 2008 Express Edition that you can get at: http://www.microsoft.com/express/vwd/Default.aspx

References
Castle Project
http://www.castleproject.org/container/index.html

Windsor and MicroKernel documentation
http://www.castleproject.org/container/documentation/index.html

Architectural pattern
http://en.wikipedia.org/wiki/Architectural_pattern

Model View Presenter (MVP) article on Wikipedia
http://en.wikipedia.org/wiki/Model_View_Presenter

Model View Controller (MVC) article on Wikipedia
http://en.wikipedia.org/wiki/Model_View_Controller

Inversion of Control (IoC) article on Wikipedia
http://en.wikipedia.org/wiki/Inversion_of_control

Abstract Type article on Wikipedia
http://en.wikipedia.org/wiki/Abstract_type

Generic Programming article on Wikipedia
http://en.wikipedia.org/wiki/Generic_programming

Method overriding article on Wikipedia
http://en.wikipedia.org/wiki/Method_overriding

Interface article on Wikipedia
http://en.wikipedia.org/wiki/Interface_Computer_Science

Delegation pattern article on Wikipedia
http://en.wikipedia.org/wiki/Delegation_pattern

Logging NHibernate SQL with log4net in ASP.NET

Have you ever wondered how to log the SQL generated by NHibernate?

This post tries to exemplify just that.

NHibernate uses HQL to leverage its expressiveness to the developer, but behind the scenes there is an engine that transforms the HQL into pure SQL that is executed against the database. This SQL can be logged so that you can see its structure and get a snapshot of what the database engine receives.

log4net is a logging tool that helps the developer see what SQL NHibernate is generating under the covers.

This is a brief description of log4net taken from its homepage:

log4net is a tool to help the programmer output log statements to a variety of output targets.

First and foremost you need to enable NHibernate logging in its configuration file. The property that sets this is hibernate.show_sql.

<add key="hibernate.show_sql" value="true" />

The following piece of code shows how to configure an appender and a logger that makes use of the appender. This code is kept inside the Web.config file in the log4net configuration section:

<appender name="NHibernateRollingFileAppender" type="log4net.Appender.RollingFileAppender">
    <file value="LogNHibernate.txt"/>
    <appendToFile value="true"/>
    <rollingStyle value="Size"/>
    <datePattern value="yyyyMMdd"/>
    <maxSizeRollBackups value="10"/>
    <maximumFileSize value="10MB"/>
    <layout type="log4net.Layout.PatternLayout">
        <conversionPattern value="%date - %message%newline"/>
    </layout>
</appender>

<logger name="NHibernateLogger" additivity="false">
    <level value="DEBUG"/> <!-- ALL, DEBUG, INFO, WARN, ERROR, FATAL or OFF -->
<appender-ref ref="NHibernateRollingFileAppender"/> </logger>

I’ll describe each part of the above code.

<appender name="NHibernateRollingFileAppender" type="log4net.Appender.RollingFileAppender">

Appender is an output destination. In this case its a RollingFileAppender. It writes logging events to a file in the file system.

<file value="LogNHibernate.txt"/>

The file property specifies the name of the file that’ll store the logs.

<appendToFile value="true"/>

The appendToFile property is set to true so that the appender will overwrite existing files.

<rollingStyle value="Size"/>

The rollingStyle property set how to roll log files. In this case the appender will roll log files based on the file size.

<datePattern value="yyyyMMdd"/>

To change the rolling period we need to set the datePattern property. It would be used if we adopted a rollingStyle based on Date instead of Size.

<maxSizeRollBackups value="10"/>
<
maximumFileSize value="10MB"
/>

Up to 10 old files of 10MB each will be kept. These rolled files will be named: LogNHibernate.txt.1, LogNHibernate.txt.2, LogNHibernate.txt.3, etc...

<layout type="log4net.Layout.PatternLayout">
<conversionPattern value="%date - %message%newline"
/>
</
layout
>

A layout enables us to customize the output format. This is accomplished by associating a layout with an appender.

The PatternLayout, lets the user specify the output format according to conversion patterns similar to the C language printf function.

<logger name="NHibernateLogger" additivity="false">

This is the logger and its additivity property controls appender accumulation, that is, how the logs are printed in the hierarchy of loggers.

For example, the output of a log statement of logger NHibernateLogger will go to all the appenders in NHibernateLogger and its ancestors. This is the meaning of the term "appender additivity".

<level value="DEBUG"/>

The level property controls the amount of information you want to be written to the log.

<appender-ref ref="NHibernateRollingFileAppender"/>

The property appender-ref specifies what appenders this logger uses.

That’s it! :-)

With this basic configuration you can start you search for points where NHibernate is generating to much queries where it shouldn’t.

I’m currently working on a performance branch where I’m learning how to deal with NHibernate lazy configuration.

This process of logging the SQL generated by NHibernate plays a great role when one is solving the bottlenecks involved in performance implications.

Just one note: keep in mind that the process of logging is by itself an onerous one. The amount of data that gets written by NHibernate is expressive and depending on the level of information you set inside the logger, the file size will grow very fast.

Hope this helps the fellow developers.

References

log4net homepage
http://logging.apache.org/log4net

log4net introduction
http://logging.apache.org/log4net/release/manual/introduction.html

log4net configuration examples
http://logging.apache.org/log4net/release/config-examples.html

Hello World Web Site with ASP.NET MVC

Hello World
A "hello world" application prints out "Hello, world!" on the screen. It is used in many introductory tutorials for teaching a programming language or upcoming technology. Such a program is typically one of the simplest programs possible in a such language or specific technology.

ASP.NET
ASP.NET
is a web application framework developed and marketed by Microsoft, that developers can use to build dynamic web sites, web applications and web services. It was first released in January 2002 with version 1.0 of the .NET Framework, and is the successor to Microsoft's Active Server Pages (ASP) technology. ASP.NET is built on the Common Language Runtime, allowing programmers to write ASP.NET code using any supported .NET language.

MVC
Model-View-Controller (MVC) is an architectural pattern used in software engineering. Successful use of the pattern isolates business logic from user interface considerations, resulting in an application where it is easier to modify either the visual appearance of the application or the underlying business rules without affecting the other. In MVC, the Model represents the information (the data) of the application and the business rules used to manipulate the data, the View corresponds to elements of the user interface such as text, checkbox items, and so forth, and the Controller manages details involving the communication to the Model of user actions such as keystrokes and mouse movements.

In detail what happens in the Model-View-Controller pattern is:

  • Browser requests URL
  • Route is determined
  • Controller is activated
  • Method on Controller is invoked
  • Controller does some stuff
  • Controller renders the View, passing in ViewData

Hello World Web Site
This Web Site basically displays a "Hello, [Name]" message. The variable "Name" receives the data that is passed in the URL to the HelloWorldController action method. The action method will store the URL data in the Controller's ViewData object. The ViewData object will then be used when the View is rendered. It'll be more clear after you implement the code.

Note: I'm not using database interaction (database Model), so the Model part of the MVC pattern isn't created.

I'll show you the steps I used to get an ASP.NET MVC Web Site running with Microsoft Visual Web Developer 2008 Express Edition.

It's important to note that the current version of ASP.NET MVC is the ASP.NET MVC Preview 2. This version wasn't planned to be used with Visual Web Developer Express, so it's necessary to use an adapted project template to get it going properly.

Stuff to download
In order to get the necessary software parts you should install the following if you still haven't them.

  1. Microsoft Visual Web Developer 2008 Express Edition
  2. ASP.NET MVC Preview 2
  3. ASP.NET 3.5 Extensions Preview
  4. ASP.NET MVC Project template

It's mandatory that you install all the above software to avoid erros when debugging the web site. I've run into errors just because I hadn't the ASP.NET 3.5 Extensions Preview, so do install everything.

Implementing the Hello World Web Site
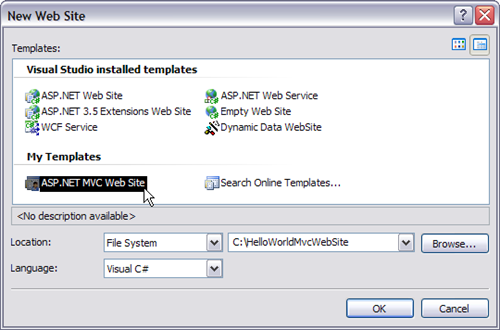
Open Visual Web Developer and go to menu File - New Web Site. On the New Web Site dialog window, select your language of preference according to the ASP.NET MVC Project Template you selected above. This option can be selected on the combo box related to Language. If you don't change the language you won't see the project template. Give the Web Site the name HelloWorldMvcWebSite.

VWDEXHelloWorldASPNETMVCNewWebSite

The project structure is different from the one of a Web Application that is only available on paid versions of Visual Studio Web Developer that is included in Microsoft Visual Studio Standard and Microsoft Visual Professional.

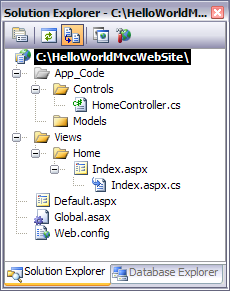
The following is the the structure you get when a new ASP.NET MVC Web Site is created:

VWDEXHelloWorldASPNETMVCSolutionExplorer

Creating a new Controller
Let's create a new Controller called HelloWorld. To accomplish this, right-click on the file HomeController.cs and select Copy. Right-click on the folder Controls and select Paste. You'll have a new file called Copy of HomeController.cs. Right-click on this file and rename it to HelloWorldController.cs. Open this file and change its content so that it looks like the following:

public class HelloWorldController : Controller
{
  [ControllerAction]
  public void HiThere()
  {
    RenderView("HelloWorld");
  }
}

Creating a new View
Let's create a new View that will render the data. To accomplish this, right-click on the folder Views and select New Folder. Give the new folder the name HelloWorld. Now right-click on the file Index.aspx and select Copy. Right-click on the folder HelloWorld and select Paste. You'll have a new file called Index.aspx inside the HelloWorld folder. Right-click on this file and rename it to HelloWorld.aspx. Open this file and change its content so that it looks like the following:

<%@ Page Language="C#" AutoEventWireup="true" CodeFile="HelloWorld.aspx.cs" Inherits="views_Home_Index" %>
<!DOCTYPE html PUBLIC "-//W3C//DTD XHTML 1.0 Transitional//EN" "http://www.w3.org/TR/xhtml1/DTD/xhtml1-transitional.dtd">
<html xmlns="http://www.w3.org/1999/xhtml">
<head id="Head1" runat="server">
    <title>Hello World ASP.NET MVC Application</title>
</head>
<body>
    <form id="form1" runat="server">
    <div>
         <h1>Hello, <%= ViewData["Name"] %></h1>
    </div>
    </form>
</body>
</html>

Configuring the routes on the Global.asax file
The routes map the URL to the proper action method defined within the Controller.

An action method called HiThere was created inside the HelloWorldController. This method is responsible for invoking the RenderView method that then will render the View (HelloWorld.aspx).

To the above described take effect it's necessary that the proper routing (mapping rules from URLs to action methods) be configured when the application starts.

Open the file Global.asax and change its content so that it looks like the following:

<%@ Application Language="C#" %>
<%@ Import Namespace="System.Web.Mvc" %>

<script RunAt="server">

  void Application_Start(object sender, EventArgs e)
  {
    // Code that runs on application startup
    RouteTable.Routes.Add(new Route
    {
      Url = "[controller]/[action]/[id]",

      Defaults = new { action = "HiThere", id = (string)null },

      RouteHandler = typeof(MvcRouteHandler)
    });

    RouteTable.Routes.Add(new Route
    {
      Url = "Default.aspx",

      Defaults = new { controller = "Home", action = "Index", id = (string)null },

      RouteHandler = typeof(MvcRouteHandler)
    });
  }

  void Application_End(object sender, EventArgs e)
  {
    //  Code that runs on application shutdown
  }

  void Application_Error(object sender, EventArgs e)
  {
    // Code that runs when an unhandled error occurs
  }

  void Session_Start(object sender, EventArgs e)
  {
    // Code that runs when a new session is started
  }

  void Session_End(object sender, EventArgs e)
  {
    // Code that runs when a session ends.

    // Note: The Session_End event is raised only when the sessionstate mode

    // is set to InProc in the Web.config file. If session mode is set to StateServer

    // or SQLServer, the event is not raised.
  }

</script>

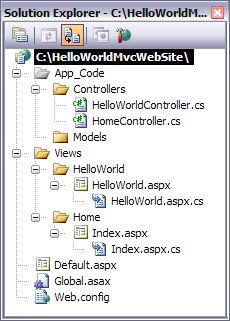
The structure of the Web Site must be like the following in the end:

VWDEXHelloWorldASPNETMVCSolutionExplorerEnd

Starting the debugger
Now hit F5. The Web Site will appear in a new web browser window with the following URL: http://localhost:1717/HelloWorldMvcWebSite/

A message of Welcome will be displayed since the page Index.aspx is the Start Page.

Type the following address: http://localhost:1717/HelloWorldMvcWebSite/HelloWorld/

A "Hello,", message is shown. The HelloWorld Controller is being called according to the route table defined above. The default method is HiThere with its id parameter set to null. That's why the View (HelloWorld.aspx) is showing a "Hello, " message. Since an id isn't being passed the only message shown is "Hello, ".

Typing the following address: http://localhost:1717/HelloWorldMvcWebSite/HelloWorld/HiThere/Leniel

A "Hello, Leniel" message is shown. This time the URL conforms with the route that was defined inside the Global.asax file, that is:

Url = "[controller]/[action]/[id]"

These are the assignments done when the routing system detects a URL like the one above:

controller = HelloWord action = HiThere id = Leniel

Final notes
There is no doubt that the ASP.NET MVC Framework turns the life more clean and simple.

It's always good to work in an organized environment. Separating the code related to data base interaction (Model), business logic (Controller) and Presentation/UI (View) is perfect.

Not so long ago, the programming environment was a mess wit lots of event handlers mixed with data base interactions and UI code. It was really difficult to manage all that mess. But thanks God things are getting better as it should.

Another great advantage is how the URL routing is done. It translates/conforms well to the naming scheme adopted in a given project. No more unreadable URLs that are difficult to deal with. It lends to a better searchable web site. The website will play friendly with web search crawlers.

References
To get a handful of examples I advise you to check ScottGu's blog. http://weblogs.asp.net/scottgu/archive/tags/MVC/default.aspx http://weblogs.asp.net/scottgu/archive/2007/11/13/asp-net-mvc-framework-part-1.aspx

ASP.NET MVC : The Official Microsoft ASP.NET Site
http://www.asp.net/mvc/

ASP.NET MVC - Building Web Apps without Web Forms
http://msdn.microsoft.com/en-us/magazine/cc337884.aspx

you've been HAACKED
http://haacked.com/

Visual Web Developer Web Site Project
You can get the Hello World MVC Web Site project at: http://leniel.googlepages.com/HelloWorldMvcWebSite.zip