Showing posts with label Blogger. Show all posts

Delete Blogger Navbar section/widget from your blog template code

In the past I used to just hide Blogger’s navbar widget with some CSS code but it was still there being loaded in the HTML code. This approach is inefficient because I really don’t want the navbar. So why should it still be there in the code taking some precious time to load and impacting the user experience?

Blogger navbarFigure 1 - Blogger navbar

In my case when I looked at the Layout section of my blog in Blogger dashboard I saw that the navbar section was locked (see the locked=’true’ in Figure 2) which means I could not delete it in the Layout screen. So there’s only one option to really get rid of it and it is through the widget code.

If you look carefully you’ll note that the navbar’s code loads some JavaScript files as the Google Plus One plusone.js file. This is impacting my page load speed because I’m already loading the plusone script somewhere else since I have a customized template. This leads to duplicate requests for the same JavaScript file. This is really really bad. There’s no need for it.

So I was after a way of removing the navbar forever; not just hiding it with CSS. I then found a way of doing it but it didn’t work for me. Blogger redesigned its interface and maybe this is the problem.

Then I just thought: what if I try to select the navbar section code and delete it and hit save on the HTML template – who knows… this can work out. What’s the result: it does work out.

How to do it? Follow these 10 simple steps…

1 - First save a backup copy of your blog template for the case where something goes wrong;

2 - Go to Blogger dashboard and select Template in the menu on the left;

3 - Hit the Backup / Restore button at the screen top right and save a backup copy of your layout;

4 - In the Template screen, click Edit HTML button;

5 - Click the checkbox Expand Widget Templates;

6 - Hit Ctrl + F and find the string ‘navbar’;

7 - Select the section code like the one shown in the following screenshot:

Selecting the navbar section/widget code while editing the blog’s template HTML codeFigure 2 - Selecting the navbar section/widget code while editing the blog’s template HTML code

8 - Hit delete on the keyboard;

9 - Click the Save template button in orange. You should get this message:

Warning message informing that deleting the navbar widget cannot be undoneFigure 3 - Warning message informing that deleting the navbar widget cannot be undone

10 - Click Delete widgets button and you’re done. Smile

Now your page will load a bit faster and this is pretty nice for the user visiting your blog.

Blogger dynamic views with Undocked Gadgets bar

Blogger recently launched gadgets support for dynamic views. This is really cool and was a missing piece to go with dynamic views.

One of the things that I really didn’t like about the gadget bar is that it’s hidden (docked) in the right side of the window. It’s difficult to see and so I Googled about an undocked version but couldn’t find it.

Blogger docked gadgets sidebar (barely visible) or could we say hidden?Figure 1 - Blogger docked gadgets sidebar (barely visible) or could we say hidden?

Here I show you how to get an undocked version so that your visitors can enjoy the gadgets bar in its full glory. Follow these simple steps:

1 - Select the Template option at draft.blogger.com

2 - Click the Customize button

3 - In the Window that opens select Advanced

4 - Select Add CSS

5 - Copy & paste the following piece of code in the Add custom CSS field

#gadget-dock
{
    right: 0;
}

6 - Click Apply to blog button in the window top right corner

You won’t see the change applied immediately.

Now go and open your blog and you should see an undocked gadgets bar!

Blogger undocked gadgets sidebar (now visible)Figure 2 - Blogger undocked gadgets sidebar (now visible)

I hope blogger gives the option to customize this without the need for CSS code. It’ll be easier for its users and will provide a better experience for blog’s visitors… Alegre

EDIT

To answer Hannah’s question: if you also want to customize the background colors of the gadgets bar, you can apply these styles following the same procedure described above:

.gadget-icons
{
    background-color: red;
}

.gadget-title
{
    background-color: red;
}
.gadget-selected .gadget-icons
{
    background-color: yellow;
}

One thing to remember here is that as the gadgets’ icons are white you must choose a background color that’s not too much whitish.

Play with the colors and enjoy!

Blogger Posts Searcher using Google Data .NET/Java Client APIs

It just happened today that I wanted to know if I had already published a post with a given title in one of the blogs I publish: http://jes4us.blogspot.com. During translation (I translate the posts from English to Portuguese) I had a feeling that I had  already worked on a similar text… well, it turns out I was mistaken!

Instead of going through the extensive list of posts looking one by one I thought why not leverage the power of Google Data API? You may say: why not do a simple Google search instead? Good point. As I like to play with code I couldn’t resist.

So here it is. A simple and faster way of knowing if I have a post with a given title. Bellow you’ll find the codez to both the .NET client API and the Java one.

Blogger Data API for .NET
1 - Download the client library here: http://code.google.com/p/google-gdata/downloads/list

2 - Install the .msi package Google_Data_API_Setup_1.9.0.0.msi.

3 - Create a new Console project and reference the DLL Google.GData.Client that’s in this folder: C:\Google Data API SDK\Redist

using System;
using System.Linq;
using Google.GData.Client;

namespace BlogPostsSearcher
{
    class Program
    {
        static void Main(string[] args)
        {
            Service bloggeService = AcquireService();

            AtomFeed feed = AcquireAndSetupFeed(bloggeService);

            // Search posts that contain the word "StringToSearchFor" in their titles
            var query = feed.Entries.Where(p => p.Title.Text.Contains("StringToSearchFor");

            // Writes the Blog's Title
            Console.WriteLine(feed.Title.Text);

            // Prints each post found...
            foreach (AtomEntry entry in query)
            {
                Console.WriteLine(string.Format("Post Title: {0} - Date Published: {1}", entry.Title.Text, entry.Published.ToShortDateString()));
            }

        }

        private static AtomFeed AcquireAndSetupFeed(Service service)
        {
            FeedQuery blogFeedUri = new FeedQuery("http://www.blogger.com/feeds/" + YourBlogID + "/posts/default");

            // Setting the number of posts to retrieve
            blogFeedUri.NumberToRetrieve = 1000;

            AtomFeed feed = service.Query(blogFeedUri);
            
            return feed;
        }

        private static Service AcquireService()
        {
            Service service = new Service("blogger", "YourCompanyName-BloggerPostsSearcher");

            service.Credentials = new GDataCredentials("YourEmailAddress@gmail.com", "YourPassword");

            GDataGAuthRequestFactory factory = (GDataGAuthRequestFactory)service.RequestFactory;
            
            return service;
        }
    }
}

Blogger Data API for Java
1 - Download the client library here: http://code.google.com/p/gdata-java-client/downloads/list

2 - Unzip the file http://code.google.com/p/gdata-java-client/downloads/detail?name=gdata-src.java-1.46.0.zip

3 - Create a new Java Project and add references to:
- gdata-client-1.0.jar that’s in this path: gdata/java/lib/
- google-collect-1.0-rc1
that’s in this path: gdata/java/deps/

import java.io.IOException;
import java.net.URL;
import java.util.List;

import com.google.gdata.client.GoogleService;
import com.google.gdata.data.Entry;
import com.google.gdata.data.Feed;
import com.google.gdata.util.AuthenticationException;
import com.google.gdata.util.ServiceException;

/**
 * @author Leniel Macaferi
 * @date 11-21-2011
 */
public class BloggerClient
{ public static void main(String[] args) throws IOException, ServiceException { try { GoogleService bloggerService = new GoogleService("blogger", "YourCompanyName-BloggerPostsSearcher"); bloggerService.setUserCredentials("YourEmailAddress@gmail.com", "YourPassword"); searchPosts(bloggerService, "YourBlogID", "StringToSearchFor"); } catch (AuthenticationException e) { // TODO Auto-generated catch block e.printStackTrace(); } } public static void searchPosts(GoogleService myService, String blogId, String search) throws ServiceException, IOException { // Request the feed URL feedUrl = new URL("http://www.blogger.com/feeds/" + blogId + "/posts/default"); Feed resultFeed = myService.getFeed(feedUrl, Feed.class); // Setting the number of posts to retrieve... resultFeed.setTotalResults(1000); List<Entry> posts = resultFeed.getEntries(); // Print the results System.out.println(resultFeed.getTitle().getPlainText()); for (Entry post : posts) { if(post.getTitle().getPlainText().contains(search)) { System.out.println("\t" + post.getTitle().getPlainText()); } } System.out.println(); } }

In the code above you need to replace accordingly the following parts:

- YourEmailAddress
- YourPassword
- YourBlogID

References
Blogger Client Libraries and Sample Code

Blogger Developer's Guide: .NET

Blogger Developer's Guide: Java

Backup blogger posts with Blogger Backup

If you want to use Blogger’s built in function take a look in this question at StackOverflow.
Updated on 08-10-2010

I just wanted to backup my blogger posts. I searched for a tool that could automate the process and fortunately I found a pretty good piece of software that does just that. Its name is Blogger Backup Utility.

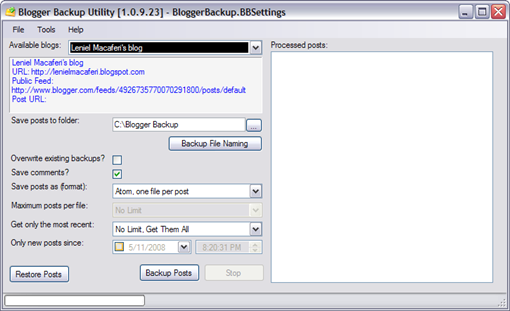
The software enables you to backup your posts with a high degree of customization. You can backup all the blogs you have. Each one will have its own backup settings.

You can choose if you want to save posts' comments, in what format (one Atom XML file per post or all the posts in a single file) to save the posts, if you want only the most recent posts or the ones included in the specified data range.

See the screenshot of the main window bellow:

BloggerBackUpUtilityMainWindow

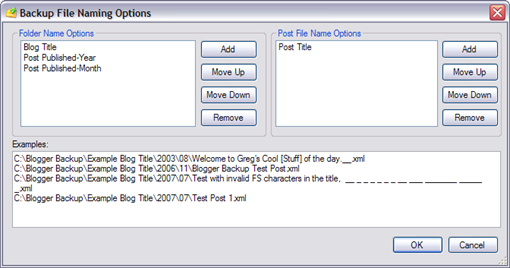
Clicking on the button Backup File Naming you'll have the chance of specifying the naming options for the backup files.

There are to configurable options: Folder Name Options and Post File Name Options.

In Folder Name Options you can configure the directory structure in which your posts will be saved.

In Post File Name Options you can configure the name of each post.

In both Folder Name and Post File Name, you can chose from a diverse array of patterns to form the name of the directory structure and posts.

See the screenshot of the Backup File Naming Options:

BloggerBackUpUtilityNamingOptions

After setting up your blog configurations you can click the button Backup Post in the Main Window.

A progress bar on the status bar and list of processed posts will show you the backup process.

The inverse process is also possible, that is, to restore your blog posts, just click on Restore Posts in the Main Windows.

It's really simple, fast and efficient. It does what it's meant to do.

The app only backups in the Atom file format that is an XML file.

Bellow is the structure of the XML that represents the backup copy of this post:

<?xml version="1.0" encoding="utf-8"?>
<entry xmlns="http://www.w3.org/2005/Atom">
  <title type="text">Backup blogger posts with Blogger Backup</title>
  <id>tag:blogger.com,1999:blog-4926735770070291800.post-7337460476756797508</id>
  <link href="http://lenielmacaferi.blogspot.com/2008/05/backup-blogger-posts-with-blogger.html" rel="alternate" type="text/html" title="Backup blogger posts with Blogger Backup" />
  <link href="http://www.blogger.com/comment.g?blogID=4926735770070291800&amp;postID=7337460476756797508" rel="replies" type="text/html" title="0 Comments" />
  ...
<author> <name>Leniel Macaferi</name> <email>noreply@blogger.com</email> <uri>http://www.blogger.com/profile/17950821674268154143</uri> </author> <category term="Blogger" scheme="http://www.blogger.com/atom/ns#" /> ...
<content type="html"> ...
</content> <updated>2008-05-15T03:45:31-03:00</updated> <published>2008-05-15T03:08:00-03:00</published> </entry>

I wondered how I could extract only the content that interested me and present it in a different format as HTML.

In a next post I'll show you how to transform the XML returned by Blogger Backup into an HTML file. To that end I'll use a XSLT file.

Where to download Blogger Backup Utility?
You can find Blogger Backup at CodePlex at the following address:
http://www.codeplex.com/bloggerbackup

It is developed by only one guy named Greg.

This is the definition given by the author:

The Blogger Backup utility is intended to be a simple utility to backup to local disk your Blogger posts.

Using the GData C# Library, the utility will walk backward in time, from your latest post to your last, saving each post to a local Atom/XML file.

I congratulated him and wrote on the project's page at CodePlex that the addition of the HTML format when saving the posts would be a good feature in case someone wanted to save the posts in an HTML fashion instead of XML.

For more screenshots with descriptions, follow this link:
http://www.codeplex.com/bloggerbackup/Wiki/View.aspx?title=Screenshots&referringTitle=Home